For my self-promotion project, I wanted to keep it green...use repurposed, sustainable, and/or environmentally-friendly materials whenever possible. When it comes to certain materials, however, green alternatives aren't nearly as effective as the status quo. The 2 items I used that were definitely not environmentally-friendly were Krylon Sealer and 3M Super 77 Adhesive. Both items contain some serious health warnings on the back. Don't breathe it, don't touch it, wear goggles, ventilate the room, no open flames...and call a doctor if you decide to ignore any of these warnings.
In 2002, 3M reformulated super 77 to use an acetone solvent (not considered a VOC) instead of cyclohexane (an extra-nasty VOC). The big stink from the Krylon sealer is from toluene, the VOC in paint thinner that makes you light-headed. The sealer also has an acetone base. With all of these active ingredients, the biggest problem is with long-term exposure. Overexposure to solvents can cause permanent brain and nervous system damage. If you live near a production facility that stores/uses large quantities of these products, groundwater contamination can potentially be a concern.
Even with all that said, Super 77 sticks paper to other stuff better than any other product I know (besides maybe 3M Hi-Strength 90)...and Krylon Sealer seals and maintains the color of wood better than anything else I've tried.
I'm definitely open to suggestions. If you know a better way to seal wood or stick paper to things, contact me and I'll try it out.
Tuesday, December 22, 2009
Tuesday, December 15, 2009
Self Promo Cover
I started production of the self-promotional project with a visit to Bring Recycling in Springfield. I knew that I wanted a large, thin board to use as a cover for the portfolio. After digging through rows of doors, shelves and furniture, I came across a shelf filled with random, discarded dresser drawers. I was looking for a big drawer with a nice, well-worn interior. I found an extra-ugly drawer for $3 that had a big, beautiful, dusty, crusty bottom piece.
I took the drawer home and extracted the nails and brads that held the bottom in place. I then looked around my garage and realized I didn't have any tools for cutting the board without it looking like a kindergartener chopped up some oak tag with safety scissors. I called my buddy Ames and traded a case of Sessions for the use of his table saw. We made the cuts, sanded the wood, then drank the beer and admired our craftsmanship.
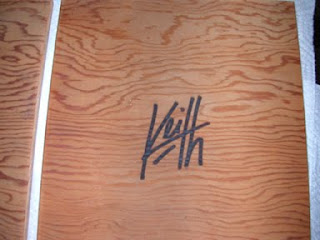
I wanted it to look like my signature had been seared into the front cover with a cattle brand. It wasn't going to be practical for me to forge a metal brand, so I considered my alternatives. I visited Jeff Franklin at Refocus Engraving in Junction City to explore my options. I worked closely with Jeff on a piece of scrap wood from the drawer bottom to get the marks just right. He had to defocus the beam to make the lines look less exacting (and to char only the surface of the wood). The results exceeded my expectations.
After sealing the wood, I attached the piano hinge to the inside and the cover was good to go. Next up: the inside.
I took the drawer home and extracted the nails and brads that held the bottom in place. I then looked around my garage and realized I didn't have any tools for cutting the board without it looking like a kindergartener chopped up some oak tag with safety scissors. I called my buddy Ames and traded a case of Sessions for the use of his table saw. We made the cuts, sanded the wood, then drank the beer and admired our craftsmanship.
I wanted it to look like my signature had been seared into the front cover with a cattle brand. It wasn't going to be practical for me to forge a metal brand, so I considered my alternatives. I visited Jeff Franklin at Refocus Engraving in Junction City to explore my options. I worked closely with Jeff on a piece of scrap wood from the drawer bottom to get the marks just right. He had to defocus the beam to make the lines look less exacting (and to char only the surface of the wood). The results exceeded my expectations.
video of the laser
After sealing the wood, I attached the piano hinge to the inside and the cover was good to go. Next up: the inside.
Friday, November 20, 2009
Self Promo Part 1
Recently, I started working on a self-promotion piece to take with me when I visit clients. I want a hand-crafted feel and I want to use environmentally-responsible materials.
As always, I start with a few pages of sketches. The plan is to take a trip over to BRING Recycling in Springfield to find some wood for the cover. I originally considered a top-hinge with screw-post design, but it started looking a little cutesy/ scrapbooky in the sketches. Now I'm thinking more along the lines of two boards and a piano hinge. Inside, I want a pocket for a cover letter and a pocket that will hold a mini- portfolio. I'd like to burn my signature into the cover or maybe do a wood inlay, but I think I'll let the type/condition of the wood help me with that decision.
Friday, November 13, 2009
First Impression
Last Friday, I visited Twin Ravens Press here in Eugene. For those of you who don't know, Twin Ravens is a letterpress shop run by one of the least-surly press operators that I've ever met, Kristin. I approached Kristin about a month ago to help me with my new business cards. The contact information on my old cards (printed by greenerprinter.com) was outdated and the design left a lot to be desired. The conditions were perfect. It was business card time.
I was as interested in the process as I was in the final product, so I passed along the information I wanted on the card and then gave Kristin carte blanche to design the cards. I was so incredibly pleased when Kristin came back with nearly a dozen designs, 3 of which were so spot-on that it took a while to decide which was the most awesome.
I went with a 2-color die-cut design printed with soy inks on handmade, custom, seeded, 100% recycled, 100% cotton paper by Porridge Papers. Once we fine-tuned the design, Kristin ordered the plates. The plates are made out of a photopolymer material. The cool thing about the plate maker, Boxcar Press, is that they have a brilliant recycling program for the plates after they are printed. Usually, these big chunks of plastic get tossed in a landfill. The used plates are recycled into car parts and consumer goods. How cool is that?
On Friday, Kristin invited me over to watch the printing process, start to finish. My inner print-nerd was stoked! I brought my little point+shoot camera along to watch the 1912 Chandler & Price letterpress spring into action. I was not disappointed. I'll post a short video and a handful of pictures below. If you want to see more pictures from press day at Twin Ravens, check out my flickr set.
Wednesday, November 11, 2009
Welcome to Ampersand!
Hello everyone,
I'm Keith, the Owner & Creative Director of Vespagraphics, a sustainability-minded, multi-faceted graphic design company located in beautiful Eugene, Oregon. We design a lot of interesting stuff for our awesome clients. It's been tough to keep the portfolio section of vespagraphics.com up to date with our latest and greatest projects, so I decided to start this blog to give folks a quick look at what we're up to. Hopefully, you'll also see the creative process at work through sketches and alternate designs. I'll also introduce you to some of our clients and the hardest-working print and design vendors this side of the Willamette River.
Subscribe to:
Posts (Atom)